Quick Answer: To legally get PS2 BIOS for PCSX2, you must dump it from your own PlayStation 2 console using homebrew software like biosdrain. Downloading BIOS files from the internet is illegal unless you own the original console.
What You’ll Learn
- Legal requirements for PS2 BIOS files
- Step-by-step BIOS dumping process
- Required tools and software
- PCSX2 setup and configuration
- Troubleshooting common issues
- Safety tips and best practices
Look, I get it. You’ve probably been staring at that blank PCSX2 screen for way too long, wondering how on earth you’re supposed to get this thing working. The emulator’s downloaded, you’ve got your favorite PS2 games ready to go, but there’s this one little problem – you need a BIOS file, and you want to do it the right way.
Here’s the thing that trips up most people: getting a PS2 BIOS legally isn’t as simple as clicking a download button. But don’t worry – I’ve been through this process myself, and I’m going to walk you through everything you need to know.
Important: This guide focuses on legal methods only. We’ll cover why this matters and how to do it right.
Understanding the Legal Landscape
❌ What’s NOT Legal
- • Downloading BIOS from random websites
- • Using someone else’s dumped BIOS
- • Sharing BIOS files online
- • Using BIOS from consoles you don’t own
✅ What IS Legal
- • Dumping BIOS from your own PS2
- • Using your dumped BIOS personally
- • Creating backups for archival purposes
- • Emulating games you physically own
The PlayStation 2 BIOS is copyrighted software owned by Sony. Think of it like this – you wouldn’t photocopy someone else’s book and call it legal, right? Same principle applies here. The only way to legally use a PS2 BIOS is to extract it from a console you actually own.
What You’ll Need
Hardware Requirements
Essential Items:
- • Your own PlayStation 2 console
- • USB flash drive (FAT32, at least 1GB)
- • Computer with internet access
- • PS2 memory card (for some methods)
Optional but Helpful:
- • Network adapter (for PS2 fat models)
- • Ethernet cable
- • Blank DVD-R disc
Software You’ll Download
| Software | Purpose | Required? |
|---|---|---|
| biosdrain | BIOS dumping utility | Yes |
| uLaunchELF | File manager for PS2 | Yes |
| FreeMcBoot | Homebrew launcher | Usually |
| PCSX2 | PS2 emulator | For testing |
Step-by-Step BIOS Dumping Process
Step 1: Prepare Your PS2 Console
First things first – you need to get your PS2 ready to run homebrew software. This is where most people get nervous, but honestly, it’s not as scary as it sounds.
For PS2 Fat Models:
You’ll typically need FreeMcBoot installed on a memory card. You can either buy a pre-modded memory card online (perfectly legal) or install it yourself if you have the technical know-how.
For PS2 Slim Models:
You might be able to use FreeDVDBoot, which works by burning a special disc. This method doesn’t require any hardware modifications.
Step 2: Set Up Your USB Drive
This part’s pretty straightforward, but getting it wrong will waste your time later.
- Format your USB drive to FAT32 (not exFAT, not NTFS)
- Make sure it’s using MBR partition table, not GPT
- Download biosdrain.elf from the official GitHub repository
- Copy the biosdrain.elf file to the root of your USB drive
Pro tip: Some USB drives just don’t play nice with PS2s. If yours isn’t detected, try a different one – preferably an older USB 2.0 drive.
Step 3: Run the BIOS Dumper
Now comes the moment of truth. Here’s what you’ll do:
- Insert your USB drive into your PS2
- Power on your PS2 (it should boot into FreeMcBoot menu)
- Navigate to uLaunchELF
- Browse to mass:/ (your USB drive)
- Find and run biosdrain.elf
- Follow the on-screen prompts
- Wait for the process to complete (usually takes a few minutes)
The dumper will create several files on your USB drive. The main one you need is typically named something like “rom0.bin” or similar.
Step 4: Transfer and Verify
Almost there! Now you need to get that BIOS file onto your computer and make sure it’s good to go.
Transfer Process:
- • Safely eject USB from PS2
- • Connect USB to your PC
- • Copy BIOS file to safe location
- • Rename it something memorable
Verification:
- • Check file size (should be ~4MB)
- • Verify it’s not corrupted
- • Test with PCSX2
- • Keep backup copies
Setting Up PCSX2 with Your BIOS
Okay, so you’ve got your BIOS file – now what? Let’s get PCSX2 configured properly.
- Download and install PCSX2 from the official website
- Open PCSX2 and go to Settings → BIOS
- Click “Browse” and navigate to your BIOS file
- Select your BIOS and click OK
Success Indicators:
- • PCSX2 shows your BIOS in the list
- • No error messages when starting
- • Games boot properly
- • PS2 logo appears when starting games
Common Issues and Solutions
Problem: USB drive not detected by PS2
Solution: Try a different USB drive, preferably USB 2.0. Make sure it’s formatted as FAT32 with MBR partition table.
Problem: BIOS dumper won’t run
Solution: Ensure you have FreeMcBoot properly installed. Try re-downloading biosdrain.elf and make sure it’s in the root directory of your USB drive.
Problem: PCSX2 won’t recognize BIOS
Solution: Check that your BIOS file isn’t corrupted and is the correct size (~4MB). Try placing it in PCSX2’s bios folder manually.
Process Overview
Own PS2 ConsoleInstall FreeMcBootPrepare USB DriveRun biosdrainExtract BIOSSetup PCSX2
Frequently Asked Questions
Can I use a friend’s PS2 to dump the BIOS?
Technically, this falls into a legal gray area. The safest approach is to only dump BIOS from consoles you personally own. If you’re borrowing a friend’s console, make sure you have their explicit permission and understand the legal implications.
How long does the BIOS dumping process take?
The actual dumping usually takes just a few minutes. However, setting up FreeMcBoot and getting everything configured can take anywhere from 30 minutes to a few hours, depending on your experience level and which method you use.
What if my PS2 is already modded with a modchip?
If you have a modchip installed, you might need to disable it temporarily during the BIOS dumping process to ensure you get a clean, uncorrupted dump. Check your modchip’s documentation for the disable procedure.
Are there different BIOS versions for different PS2 models?
Yes, absolutely! Different PS2 models and regions have different BIOS versions. The BIOS you dump will be specific to your console model and region. PCSX2 can work with various BIOS versions, but using the correct one for your games’ region often provides the best compatibility.
Can I share my dumped BIOS with others?
No, sharing BIOS files is not legal, even if you dumped them yourself. Each person needs to dump their own BIOS from their own console. This is one of those things where the law is pretty clear – distribution of copyrighted software without permission is a no-go.
Wrapping It Up
Look, I know this whole process might seem like a lot of work just to play some old PS2 games. But here’s the thing – doing it legally not only keeps you on the right side of copyright law, it also ensures you get a clean, working BIOS that’ll give you the best emulation experience possible.
Once you’ve got everything set up, you’ll have a perfectly legal way to enjoy your PS2 game collection on modern hardware. Plus, you’ll have learned something new about how these systems work under the hood.
Remember, the key is patience and following the steps carefully. If you run into issues, don’t hesitate to check the troubleshooting section or reach out to the PCSX2 community for help. Happy gaming!
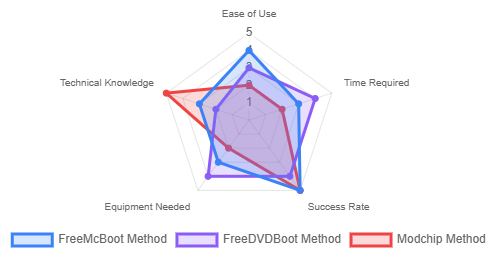
BIOS Dumping Methods Comparison