
Quick Answer: To dump your PS2 BIOS safely, you need either a FreeMcBoot memory card or FreeDVDBoot disc, plus a USB drive and the biosdrain tool. The process extracts your console’s BIOS file legally for use with emulators like PCSX2 and AetherSX2. It takes about 10-15 minutes and won’t damage your console.
What You’ll Learn
- Why you need a PS2 BIOS file for emulation
- Legal requirements and safety considerations
- Two methods: modded console (easy) vs unmodded (advanced)
- Required tools and hardware for each method
- Step-by-step dumping process with troubleshooting tips
- How to use your dumped BIOS with popular emulators
Look, I get it. You’ve got your old PS2 sitting there, maybe collecting dust, and you want to play those classic games on your computer or phone. But here’s the thing, you can’t just download a BIOS file from some random website and call it a day. That’s not safe, it’s not legal, and honestly? It’s not even reliable.
The good news is that dumping your own PS2 BIOS is actually pretty straightforward once you know what you’re doing. I’ve helped dozens of people through this process, and trust me, it’s way less scary than it sounds. Whether you’ve got a modded console or you’re working with a completely stock PS2, there’s a method that’ll work for you.
Important: This guide only covers legal BIOS dumping from your own PlayStation 2 console. Using BIOS files from other sources may violate copyright laws.
What Exactly Is a PS2 BIOS File?
Think of the PS2 BIOS as your console’s “brain” – it’s the first thing that runs when you turn on your PlayStation 2. BIOS stands for Basic Input/Output System, and it handles everything from reading discs to communicating with controllers and memory cards.
When you’re using an emulator like PCSX2 or AetherSX2, you’re basically trying to recreate a PS2 on your computer. But without the BIOS, your emulator is like a car without an engine – it might look right, but it’s not going anywhere.
What You’ll Need
The tools you need depend on whether your PS2 is modded or not. Don’t worry if you’re not sure – I’ll explain how to tell the difference.
| Console Type | Required Items | Difficulty |
|---|---|---|
| Modded PS2 (FreeMcBoot) | FreeMcBoot memory cardUSB flash drive (FAT32)biosdrain.elf file | Easy |
| Unmodded PS2 | USB flash drive (FAT32)FreeDVDBoot disc or Swap Magicbiosdrain.elf fileBlank DVD-R (for FreeDVDBoot) | Moderate |
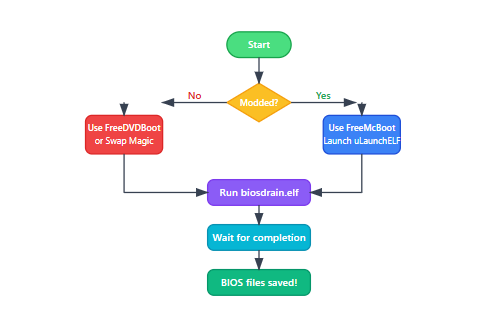
Method 1: Dumping from a Modded PS2 (The Easy Way)
If you’ve got FreeMcBoot installed, you’re in luck. This is by far the easiest method, and honestly, it’s what I recommend to most people. FreeMcBoot is a soft-mod that runs from a memory card – no hardware modifications needed.
How to Tell if You Have FreeMcBoot
Turn on your PS2 with a memory card inserted. If you see a custom menu instead of the regular PS2 browser, you’ve got FreeMcBoot. You might see options like “uLaunchELF” or “Open PS2 Loader” – that’s your confirmation.
Step-by-Step Process
- Prepare your USB drive: Format it to FAT32 (this is crucial – other formats won’t work).
- Download biosdrain: Get the biosdrain.elf file from the official PCSX2 website or trusted homebrew sources.
- Copy to USB: Put the biosdrain.elf file in the root directory of your USB drive.
- Boot FreeMcBoot: Turn on your PS2 with the FreeMcBoot memory card inserted.
- Launch uLaunchELF: Select it from the FreeMcBoot menu.
- Navigate to USB: Find the “mass:” device in uLaunchELF and open it.
- Run biosdrain: Select biosdrain.elf and press X to run it.
- Wait patiently: The dumping process takes several minutes. You’ll see “Finished Everything” when it’s done.
- Check your files: Your BIOS files will be saved to the USB drive with names like “SCPH-XXXXX.bin”.
Method 2: Dumping from an Unmodded PS2 (A Bit Trickier)
Don’t have FreeMcBoot? No problem. It’s a bit more involved, but totally doable. The main challenge is getting uLaunchELF to run without a soft-mod. Here are your options:
FreeDVDBoot Method (Recommended)
This is probably your best bet if you don’t have FreeMcBoot. FreeDVDBoot exploits a vulnerability in the PS2’s DVD player to run homebrew.
- Check compatibility: Not all PS2 models work with FreeDVDBoot. Check the compatibility list online first.
- Download the right ISO: Get the FreeDVDBoot ISO that matches your console model from the official GitHub repository.
- Burn to DVD: Use a DVD-R (not DVD+R) and burn at a slow speed (4x is ideal).
- Prepare biosdrain: Put biosdrain.elf on your FAT32 USB drive.
- Boot the disc: Insert the FreeDVDBoot disc and turn on your PS2. uLaunchELF should load automatically.
- Run the dumper: Navigate to your USB drive and run biosdrain.elf just like in Method 1.
Pro Tip: If FreeDVDBoot doesn’t work with your model, you might need to look into Swap Magic or other disc-swapping methods. These are more complex and require precise timing.
Visual Process Overview
Understanding Your BIOS Files
Once the dumping process is complete, you’ll have several files on your USB drive. Here’s what each one does:
| File Name | Size | Purpose |
|---|---|---|
| SCPH-XXXXX.bin | 4MB (4,194,304 bytes) | Main BIOS file for emulators |
| rom0.bin | 4MB | Boot ROM (alternative format) |
| rom1.bin | 256KB | DVD player ROM |
| erom.bin | 256KB | Extended ROM |
| nvm.bin | 1KB | Non-volatile memory settings |
Good to know: Most emulators only need the main SCPH-XXXXX.bin file, but having all the files ensures maximum compatibility.
Setting Up Your Emulator
Now comes the fun part – actually using your BIOS files! The process is slightly different for each emulator, but the basic idea is the same.
PCSX2 Setup
- Copy your BIOS files to the PCSX2 bios folder (usually in Documents/PCSX2/bios)
- Open PCSX2 and go to Settings > BIOS Selector
- Your dumped BIOS should appear in the list automatically
- Select it and save your settings
AetherSX2 (Android) Setup
- Copy the BIOS file to your phone’s internal storage
- Open AetherSX2 and go to Settings > BIOS
- Browse and select your BIOS file
- The app will automatically validate and use it
Common Issues and Solutions
USB Drive Not Detected
Make sure your USB drive is formatted as FAT32 with MBR partition table (not GPT). Some older USB drives work better than newer ones with PS2.
BIOS File Too Small
If your BIOS file is smaller than 4MB, the dump probably failed. Try using a different USB drive or re-running the process.
FreeDVDBoot Won’t Boot
Try burning the disc at a slower speed (4x) and use DVD-R media instead of DVD+R. Some PS2 models are picky about disc types.
Frequently Asked Questions
Is it legal to dump my PS2 BIOS?
Yes, absolutely! You own the console, so you have the right to make a backup copy of its BIOS for personal use. Just don’t share it with others or download someone else’s BIOS – that’s where things get legally murky.
Will this damage my PS2?
Not at all. BIOS dumping is a read-only process – we’re just copying data, not modifying anything. Your console will work exactly the same as before. I’ve done this dozens of times without any issues.
Can I use the same BIOS file on different emulators?
Yep! Once you’ve dumped your BIOS, you can use the same file with PCSX2, AetherSX2, or any other PS2 emulator. Just copy it to each emulator’s BIOS folder.
How long does the dumping process take?
Usually between 5-15 minutes, depending on your USB drive speed. The PS2’s USB ports are pretty slow by modern standards, so be patient. You’ll know it’s done when you see “Finished Everything” on screen.
What if I don’t have a PS2 anymore?
Unfortunately, there’s no legal way to get a PS2 BIOS without owning the console. You could buy a used PS2 just for dumping (they’re pretty cheap these days), or look into getting a FreeMcBoot memory card online to make the process easier.
Ready to Start Gaming?
And there you have it – everything you need to know about safely dumping your PS2 BIOS. I know it might seem like a lot at first, but once you’ve done it once, you’ll realize it’s actually pretty straightforward. The hardest part is usually just getting all the tools together.
Remember, this isn’t just about following rules – using your own BIOS ensures you get the best possible emulation experience. Your games will run more smoothly, you’ll have fewer compatibility issues, and you can sleep easy knowing everything is above board.
Now go fire up that emulator and relive some of those classic PS2 memories. Happy gaming!